 NFT Collections")

Android Architecture Components is a collection of libraries that help you design robust, testable, and maintainable applications with more power over lifecycle management and data persistence.

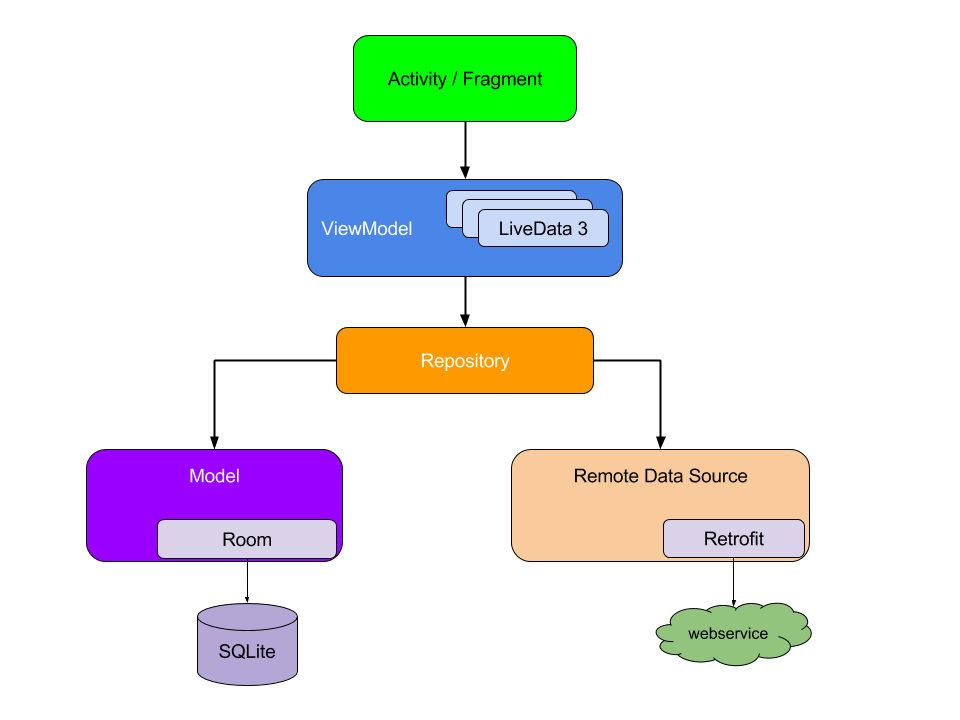
In this article, we will focus on a subset of Android Architecture components. We will develop a notes application, which basically takes some input from the user (LiveData), stores it in a local database (Room) and displays it on the screen (ViewModel).
Before we start building this application, let's first understand MVVM.
What is MVVM?
If you are familiar with MVVM, you can skip this section entirely.
MVVM is one of the architectural patterns that improves separation of concerns, allowing the separation of user interface logic from business (or back-end) logic. Its goal is to achieve the following principle “Keep UI code simple and free from application logic to make it more maintainable”.
There are 3 parts to the Model-View-ViewModel architecture:
- The model is the data layer of your application. It abstracts the data source.
- Views contain your application's UI. Most often implemented as Activities or Fragments. Views inform the ViewModel about user interactions and display the results received from the ViewModel. Views should be lightweight and contain zero to very little business logic.
- The ViewModel acts as a bridge between your View and your Model. It works with the Model to get and store data. The View observes and reacts to changes in the data exposed by the ViewModel.
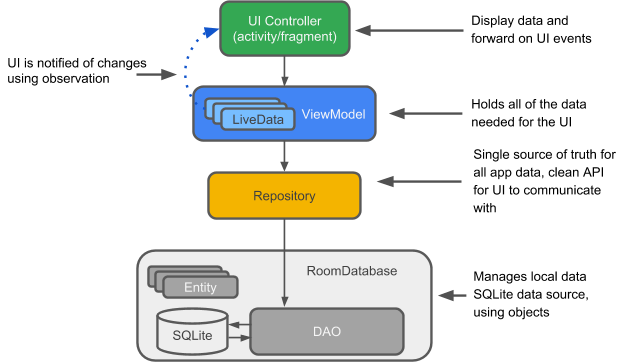
Here is a typical high-level MVVM application architecture:
Implementation steps
We will follow these steps to implement Android Architecture Components in our app:
- Add Space and Life Cycle Dependencies
- Settings Room
- Learn about Live Data
- Creating a Repository Class/Presentation Layer
- Implement ViewModel
- Add Adapter and RecyclerView
- Populating the Database
- Connect UI and Data
- Create AddNoteActivity
Now we discuss these steps in the order mentioned.
1. Add Dependencies
We need to add Room and Lifecycle components. Room is basically a database object mapping library used to access databases. Lifecycle has some nice sets of classes like ViewModel and LiveData that we will use to manage the lifecycle of our application.
First add the version number, then add this library to the build.gradle (Module: app) file, at the end of the dependencies block.
dependencies {
    def lifecycle_version = "1.1.1"
    def room_version = "1.1.1"
    ---
    // Room components
    implementation "android.arch.persistence.room:runtime:$room_version"
    kapt "android.arch.persistence.room:compiler:$room_version"

    // Lifecycle components
    implementation "android.arch.lifecycle:extensions:$lifecycle_version"
    kapt "android.arch.lifecycle:compiler:$lifecycle_version"
}
2. Settings Room
There are 3 main components in Room:
- "Unity"
- “Dao”
- “Database”
Entity
An entity is simply a POJO that will also be a table in the database. For example, you can create a POJO class and annotate it with the “@Entity” annotation. You can also identify which field is the primary key with “@PrimaryKey”.
@Entity(tableName = "notes_table")
data class Note(
    var title: String,
    var description: String

) {
    @PrimaryKey(autoGenerate = true)
    var id: Int = 0
}
Here, we have a class Note, and the table name is “notes_table”. We have created three columns id, title, description and also made id as the primary key by annotating “@PrimaryKey” and autoGenerate to true.
Data Access Object (DAO)
Data Access Object (DAO) is an interface annotated with Dao. This is where CRUD (create, read, update, and delete) database operations are defined. Each method is annotated with “ @Insert ”, “ @Delete ”, “ @Query(SELECT * FROM) ”.
@Dao
interface NoteDao {

    @Insert
    fun insert(note: Note)

    @Query("DELETE FROM notes_table")
    fun deleteAllNotes()

    @Query("SELECT * FROM notes_table ")
    fun getAllNotes(): LiveData<List<Note>>

}
Here, we have the NoteDao interface and some methods that we will call to perform our queries. To insert data, we annotate “@Insert” to insert the method. Room doesn’t give us an annotation that can help us remove everything so we have “@Query” to perform some custom queries.
Database
Create a class that extends from RoomDatabase and annotate it with “@Database” . This class unifies Entity and DAO. Database instances can be created at runtime, by calling Room.databaseBuilder() (on device) or Room.inMemoryDatabaseBuilder() (in memory).
@Database(entities = [Note::class], version = 1)
abstract class NoteDatabase : RoomDatabase() {

    abstract fun noteDao(): NoteDao

    private var instance: NoteDatabase? = null

    fun getInstance(context: Context): NoteDatabase? {
        if (instance == null) {
            synchronized(NoteDatabase::class) {
                instance = Room.databaseBuilder(
                    context.applicationContext,
                    NoteDatabase::class.java, "notes_database"
                )
                    .fallbackToDestructiveMigration()
                    .addCallback(roomCallback)
                    .build()
            }
        }
        return instance
    }

}
Here, we have a NoteDatabase Room class where we have to declare all our entities and database version. method getInstance() will return a room database instance. If you want to modify the database, see Migration.
Live Class Data
LiveData comes from the lifecycle library, to observe data changes. It is an observable data holder class, and is also lifecycle aware meaning that it will update components that are in an active lifecycle state.
fun getAllNotes() : LiveData<List<Note>>Here in our project, where we get a list of records and we wrap the list with LiveData.
4. Create Repository Class/Presentation Layer
This is the class where we will check whether to fetch data from API or local database, or you can say we put the database fetching logic in this class.
class NoteRepository(application: Application) {

    private var noteDao: NoteDao

    private var allNotes: LiveData<List<Note>>

    init {
        val database: NoteDatabase = NoteDatabase.getInstance(
            application.applicationContext
        )!!
        noteDao = database.noteDao()
        allNotes = noteDao.getAllNotes()
    }

    fun insert(note: Note) {
        val insertNoteAsyncTask = InsertNoteAsyncTask(noteDao).execute(note)
    }

    fun deleteAllNotes() {
        val deleteAllNotesAsyncTask = DeleteAllNotesAsyncTask(
            noteDao
        ).execute()
    }

    fun getAllNotes(): LiveData<List<Note>> {
        return allNotes
    }

    private class InsertNoteAsyncTask(noteDao: NoteDao) : AsyncTask<Note, Unit, Unit>() {
        val noteDao = noteDao

        override fun doInBackground(vararg p0: Note?) {
            noteDao.insert(p0[0]!!)
        }
    }


    private class DeleteAllNotesAsyncTask(val noteDao: NoteDao) : AsyncTask<Unit, Unit, Unit>() {

        override fun doInBackground(vararg p0: Unit?) {
            noteDao.deleteAllNotes()
        }
    }

}
Here, we add wrappers for insert(), getAllNotes() and deleteAllNotes(). Room runs its operations on a non-UI thread/background thread, so we use AsyncTask.
5. Model View
This is also part of the lifecycle library; it will help you to provide data between the repository and the UI. It persists data about configuration changes and makes the existing ViewModel reconnect with the new owner instance.
Why use ViewModel?
- ViewModel is lifecycle aware so it will survive configuration changes. It will outlive Activity or Fragment.
- Easier communication between fragments, rather than relying on a hosting Activity forwarding communication.
- Works pretty well with LiveData, an observable data holder.
- You can use RxJava instead of LiveData.
class NoteViewModel(application: Application) : AndroidViewModel(application) {

    private var repository: NoteRepository =
        NoteRepository(application)
    private var allNotes: LiveData<List<Note>> = repository.getAllNotes()

    fun insert(note: Note) {
        repository.insert(note)
    }

    fun deleteAllNotes() {
        repository.deleteAllNotes()
    }

    fun getAllNotes(): LiveData<List<Note>> {
        return allNotes
    }
}
Here, we are using AndroidViewModel because we need the application context. We create wrappers for insert(), deleteAllNotes() and getAllNotes() which will use the repository related methods.
6. Add Adapter and RecyclerView
Create a layout file (note_item.xml), include two TextViews for Title and Description bounded inside a Linear Layout having vertical orientation and also include RecyclerView in activity_main.xml. Also, don’t forget to add Recyclerview and CardView dependencies in build.gradle. We also need to add an adapter class which is responsible for displaying our data on the screen.
class NoteAdapter : RecyclerView.Adapter<NoteAdapter.NoteHolder>() {
    private var notes: List<Note> = ArrayList()

    override fun onCreateViewHolder(parent: ViewGroup, viewType: Int): NoteHolder {
        val itemView = LayoutInflater.from(parent.context)
            .inflate(R.layout.note_item, parent, false)
        return NoteHolder(itemView)
    }

    override fun onBindViewHolder(holder: NoteHolder, position: Int) {
        val currentNote = notes[position]
        holder.textViewTitle.text = currentNote.title
        holder.textViewDescription.text = currentNote.description
    }

    override fun getItemCount(): Int {
        return notes.size
    }

    fun setNotes(notes: List<Note>) {
        this.notes = notes
        notifyDataSetChanged()
    }

    inner class NoteHolder(itemView: View) : RecyclerView.ViewHolder(itemView) {
        var textViewTitle: TextView = itemView.findViewById(R.id.text_view_title)
        var textViewDescription: TextView = itemView.findViewById(R.id.text_view_description)

    }
}
note_item.xml
<?xml version="1.0" encoding="utf-8"?>
<android.support.v7.widget.CardView
        xmlns:android="http://schemas.android.com/apk/res/android"
        android:orientation="vertical"
        android:layout_width="match_parent"
        android:layout_height="wrap_content"
        android:layout_marginEnd="8dp"
        android:layout_marginStart="8dp"
        android:layout_marginTop="8dp">

    <LinearLayout
            android:id="@+id/ll"
            android:layout_width="match_parent"
            android:layout_height="wrap_content"
            android:layout_margin="6dp"
            android:orientation="vertical">
        <TextView
                android:id="@+id/text_view_title"
                android:layout_width="wrap_content"
                android:layout_height="wrap_content"
                android:ellipsize="end"
                android:maxLines="1"
                android:text="Title"
                android:textAppearance="@style/TextAppearance.AppCompat.Large"/>

        <TextView
                android:id="@+id/text_view_description"
                android:layout_width="wrap_content"
                android:layout_height="wrap_content"
                android:text="Description"/>

    </LinearLayout>
</android.support.v7.widget.CardView>
7. Database Contents
Here we populate the data when the application starts and before that we also delete the existing data. We create a PopulateDbAsyncTask which is an AsyncTask usage for deleting and inserting data.
---
private val roomCallback = object : RoomDatabase.Callback() {
            override fun onCreate(db: SupportSQLiteDatabase) {
                super.onCreate(db)
                PopulateDbAsyncTask(instance)
                    .execute()
            }
        }

    }
    class PopulateDbAsyncTask(db: NoteDatabase?) : AsyncTask<Unit, Unit, Unit>() {
        private val noteDao = db?.noteDao()

        override fun doInBackground(vararg p0: Unit?) {
            noteDao?.insert(Note("Title 1", "description 1"))
            noteDao?.insert(Note("Title 2", "description 2"))
            noteDao?.insert(Note("Title 3", "description 3"))
        }
    }
8. Connect UI and Data
To display data from the database, we need an observer that will watch for data changes, LiveData in the ViewModel. We use a ViewModelProvider that will create a ViewModel for us. We need to connect our ViewModel to the ViewModelProvider , and then in the onChanged method, we always get the latest data that we can display on the screen.
class MainActivity : AppCompatActivity() {
    private val ADD_NOTE_REQUEST = 1
    private lateinit var noteViewModel: NoteViewModel
    private val adapter = NoteAdapter()
    override fun onCreate(savedInstanceState: Bundle?) {
        super.onCreate(savedInstanceState)
        setContentView(R.layout.activity_main)
        val recyclerView = findViewById<RecyclerView>(R.id.recycler_view)
        buttonAddNote.setOnClickListener {
            startActivityForResult(
                Intent(this, AddNoteActivity::class.java),
                ADD_NOTE_REQUEST
            )
        }
        recyclerView.layoutManager = LinearLayoutManager(this)
        recyclerView.setHasFixedSize(true)
        recyclerView.adapter = adapter
        noteViewModel = ViewModelProviders.of(this).get(NoteViewModel::class.java)
        noteViewModel.getAllNotes().observe(this,
            Observer<List<Note>> { t -> adapter.setNotes(t!!) })
    }
    override fun onCreateOptionsMenu(menu: Menu?): Boolean {
        menuInflater.inflate(R.menu.main_menu, menu)
        return true
    }

    override fun onOptionsItemSelected(item: MenuItem?): Boolean {
        return when (item?.itemId) {
            R.id.delete_all_notes -> {
                noteViewModel.deleteAllNotes()
                Toast.makeText(this, "All notes deleted!", Toast.LENGTH_SHORT).show()
                true
            }
            else -> {
                super.onOptionsItemSelected(item)
            }
        }
    }

    override fun onActivityResult(requestCode: Int, resultCode: Int, data: Intent?) {
        super.onActivityResult(requestCode, resultCode, data)

        if (requestCode == ADD_NOTE_REQUEST && resultCode == Activity.RESULT_OK) {
            val newNote = Note(
                data!!.getStringExtra(AddNoteActivity.EXTRA_TITLE),
                data.getStringExtra(AddNoteActivity.EXTRA_DESCRIPTION)
            )
            noteViewModel.insert(newNote)

            Toast.makeText(this, "Note saved!", Toast.LENGTH_SHORT).show()
        } else {
            Toast.makeText(this, "Note not saved!", Toast.LENGTH_SHORT).show()
        }

    }
}
activity_main.xml
<?xml version="1.0" encoding="utf-8"?>
<android.support.design.widget.CoordinatorLayout
        xmlns:android="http://schemas.android.com/apk/res/android"
        xmlns:tools="http://schemas.android.com/tools"
        android:orientation="vertical"
        android:layout_width="match_parent"
        android:layout_height="match_parent"
        tools:context=".activities.MainActivity">

    <android.support.v7.widget.RecyclerView
            android:id="@+id/recycler_view"
            android:layout_width="match_parent"
            android:layout_height="match_parent"
            tools:listitem="@layout/note_item"
            tools:itemCount="5"/>

    <android.support.design.widget.FloatingActionButton
            android:id="@+id/buttonAddNote"
            android:layout_width="wrap_content"
            android:layout_height="wrap_content"
            android:src="@drawable/ic_add"
            android:layout_marginEnd="16dp"
            android:layout_marginBottom="16dp"
            android:layout_gravity="bottom|right"/>

</android.support.design.widget.CoordinatorLayout>
Here, In MainActivity we added a cool button to open another activity where we can enter a new note, and we created a method onActivityResult where we get the data that the user has entered in AddNoteActivity.
9. Create AddNoteActivity
We create an activity where the user can enter data. Therefore we create AddNoteActivity . Here, we have two EditText for Title , Description , and a Button to submit the note.
AddNoteActivity.kt
class AddNoteActivity : AppCompatActivity() {
    companion object {
        const val EXTRA_TITLE = "com.anubhav87.mvvmtutorial.EXTRA_TITLE"
        const val EXTRA_DESCRIPTION = "com.anubhav87.mvvmtutorial.EXTRA_DESCRIPTION"
    }

    override fun onCreate(savedInstanceState: Bundle?) {
        super.onCreate(savedInstanceState)
        setContentView(R.layout.activity_add_note)
        supportActionBar?.setHomeAsUpIndicator(R.drawable.ic_close)
    }

    override fun onCreateOptionsMenu(menu: Menu?): Boolean {
        menuInflater.inflate(R.menu.add_note_menu, menu)
        return true
    }

    override fun onOptionsItemSelected(item: MenuItem?): Boolean {
        return when (item?.itemId) {
            R.id.save_note -> {
                saveNote()
                true
            }
            else -> super.onOptionsItemSelected(item)
        }
    }

    private fun saveNote() {
        if (edit_text_title.text.toString().trim().isBlank() || edit_text_description.text.toString().trim().isBlank()) {
            Toast.makeText(this, "Can not insert empty note!", Toast.LENGTH_SHORT).show()
            return
        }

        val data = Intent().apply {
            putExtra(EXTRA_TITLE, edit_text_title.text.toString())
            putExtra(EXTRA_DESCRIPTION, edit_text_description.text.toString())
        }

        setResult(Activity.RESULT_OK, data)
        finish()
    }
}
That's all for now. Run your application and try implementing more functions to the application.